MATERIALS
Rollers – recycled items – flat round items, things that will roll such as plastic bottles, denture tablet tubes, wine corks (rubbery ones), thick strong card rolls i.e. tape rolls, round polystyrene, gravy granules & salt containers, flat round cotton reels, toy rolling pins, sponge craft rollers with handles, spongy tube pipe insulation, wooden dowel, tins, empty aerosols cans
Pattern Makers - Found objects such as lace/trim [thicker type works best], zips, curtain heading tape, netting found on small tiles, patterned textured fabric such as dish cloths, wallpaper, sinamay (hat making) or other open weave fabric, jute, cord, string, purchased foam shapes, knitting, doyleys(crochet rather than paper)
Other Items
Fun foam (funky foam) available in sheets
Scissors – large & small (for small fiddly bits curvy nail scissors are good)
All purpose Adhesive such as UHU
Craft Knife
Pinking shears/ decorative edge craft scissors
Revolving Punch pliers for different size holes
Roller Paint – Acrylic, Poster, Ink Pads etc
Background Paints – Acrylic wash, Watercolour, Brusho, Dye solution/ Fabric paints etc
Paper/ Fabric
Tape/pins
Directions - Fun Foam
1. To find the size to cut, wrap the foam around your selected roller & mark it. (I find it easier to do this with the actual foam rather than a tape measure). Width wise it is best to leave a space at each edge of the roller for your fingers when rolling. Cut it to size & recheck that it fits before doing anything else with it. You now have a size to work with and can draw a pattern onto paper or onto the foam directly.
2. Fun foam is very easy to cut using scissors, craft knife, pinking shears, decorative edge scissors or punch pliers. Strips of fun foam can be cut with pinking shears or fancy craft scissors and holes can be made with punch pliers.
3. Copy your design onto the foam if you drew it onto paper. For a ‘repeating’ pattern the design will need to match at the same place, top & bottom. To do this, fold over the two ends or hold it round the roller, matching the edges together and mark the foam with a pen where the pattern needs to join. (See picture, i.e. A joins B, C joins D etc). Place a join in the most suitable place i.e. on this design it would have been better to put the join under the leaf so there wouldn’t be joins on the cherries. Some patterns don’t need to repeat, they can look OK as blocks of pattern.
4. Glue the foam to the roller with UHU glue, matching where required. (it has to be quite a strong glue, or the shapes will come off when washed). Allow to dry.
5. Tape fabric or paper to a suitable flat surface. (Plastic cover on top? – dried acrylic paint does not come off)
6. Apply colour to the patterned area on the roller or just on selected parts, use a brush if applying paint. (a paint roller gives a more even result for larger items)
7. Start rolling at one end of your fabric or paper and work up/down. Some of the rollers can be used like a rolling pin. Most need to be guided with your fingers, quite firmly, with each hand use index finger above, middle to the side and your thumb guiding from the back. If there is no blank edge for your fingers you will have to roll them where the paint is, it is quite messy and sometimes finger marks are left in the painted area, but these look like part of the pattern when a top coat of colour is applied. If the roller is hollow in the centre, guide it by inserting your fingers there.
8. After rolling is completed, and when dry, a coloured wash can be applied over the top. (Alternatively you could start out with painting the paper/fabric first)
9. For an all over pattern repeat one stripe after another to fill the page.
10. Most rollers can be rinsed under the tap after use. If it is a cardboard roller just wipe with a damp old cloth.
Directions for lace, trims, wallpaper, curtain heading, textured fabrics, cord, knitting etc
1. Look at the lace to find how big the repeat is and try to find a roller that it will fit. (if not one repeat try two, three or four repeats)
2. Wrap the lace around your selected roller and mark it.
3. Cut it to size and recheck that it fits before gluing it to the chosen roller.
4. Use acrylic paint and after the first use let the paint dry on the lace, this will act as a coating, then it can be washed after the next use. (Unless it’s a card roller. Knitting, I have found becomes soggy when washed & takes too long to dry, so it’s better to leave the paint to dry.
Directions for Wine Bottle (Spongy) Corks
1. These can be cut (carefully) with a craft knife. Simple marks can make a nice pattern. A simple long thin triangle from the edge is an example.
2. The paint will not last long as they are small, but some nice patterns can be made.
3. If you want a bigger roller, glue on funky foam, let the edges meet, but don’t overlap them. (This system was used on an old sponge roller – the sponge was removed and fun foam was glued in its place – 2 layers of foam plus foam pattern – 3 layers in total.)
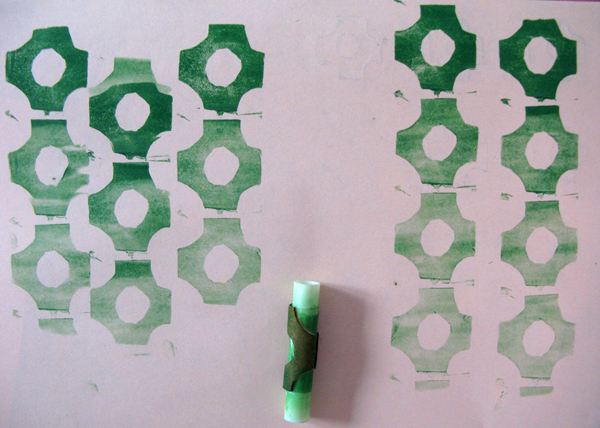
Directions for Spongy Tube Pipe Insulation
1. This is really easy to cut with a craft knife and it is easy to use.
2. Draw your design on the tube with a marker.
3. Carve out the areas with a craft knife carefully.
4. Can be rinsed under the tap after use.
Fabric samples - acrylic paints can be used for the stamps, but use textile colour, silk paints or dyes for the background colours. Acrylics can leave the fabric quite stiff. Thickened dyes are an alternative for the rollers.
If all areas don’t print as well as you would have liked either cut the best areas out for collage or disguise the bad bits with another stamp on top.
The paint will last longer on the bigger rollers as they cover a bigger area, the paint will become lighter the further you roll, but there are some nice effects when the paint is a quite light. Apply more paint to the roller if it becomes too faint, even if half way across the page. Experiment on scrap paper to check the amount of paint required for your chosen effect and pattern maker. Add water to the paint as required, it may need to be a little runnier for fabric. A pattern can be built up by using one roller on top of another after the previous one has dried.
If you really don’t want to get paint on your fingers make all your rollers using kiddies craft rollers with handles, remove the sponge & replace with fun foam, building up the layers to make it fatter, but don’t overlap the foam. Decorating paint rollers, wallpaper seam rollers, or lint rollers could also be an option, although I haven’t tried these – yet. Or wear gloves.
Some of the rollers leave a better impression than others, for instance a pattern made by punch pliers can look more like lace than real lace.
Some stamps will last longer than others, just use as long as you are able and discard.
If you want to leave a section free from the roller, mask an area with paper.
Roll with a deep colour paint and scan into the computer. Use as a background for your digital work.
You can get a free download of the technique [No 4] from Cloth Paper Scissors
Or if you have some of their old magazines my original article is in the Sept/Oct 2009 issue.